supporting aviculture since 1965. |
PROPOGATION OF BUSH FLY LARVAE
Many species of birds benefit from the provision of high protein food during the rearing of their young. Australian native quail and many soft bill species require the provision of live food to ensure breeding success. Developmental rates of pheasant chicks is enhanced by provision of high protein live food during early development. Bush fly larvae are easily produced in the desired quantities and constitute a high protein food suitable for raising avian chicks. Native Button-quail are dependent on the provision of live food for their chick’s survival and are unable to raise chicks if supplied a grain based diet deficient in live food. The bush fly life cycle is generally complete in approximately one week, meaning one does not have to plan far ahead to increase or decrease breeding stock to meet demand. Meal worms take a number of months to complete a life cycle and therefore require better forward planning to ensure availability of live food as required. Provision of termites for an avian collection requires more effort to find, obtain and keep them than the work required to supply bush fly larvae. Life cycle - (Cycle times vary and depend on brood temperatures) Day 1 Flies lay eggs. Day 2/3 Larvae appear. Day 5 Larvae reach maturity and enter pupae stage. Day 7 Pupae hatch to adult fly. Equipment required to raise bush fly larvae. 1 Ply wood box with approximate dimensions (50 cm wide x 50 cm deep by 60 cm high) with small side access door and fly screen mesh covered front panel. (The “fly box”) 2 A heat source (utilises 2 x 18 watt light globes) including batten fittings wired in series. 3 Five suitable larvae raising containers. 4 One small open container to hold brood stock 5 One water container stuffed with sponge rubber 6 One small open container for sugar. 7 Full cream milk powder (alternately containers of full cream long milk) 8 Supply of fresh wheat bran. 9 Fly starter kit. Setting up the Ply wood fly box - (item 1) The authors “fly box” is manufactured from 1/2” thick marine grade plywood and is sized to accommodate the following contents:- Item Item Description 1 Five (5) larvae raising containers (10, 15 or 20 larvae raising containers for higher production) 2 One (1) small open top shallow sugar storage container 3 One (1) rubber sponge filled water container 4 One (1) small container to accommodate starter kit. Ensuring the “fly box” is not overly generous ensures appropriate temperatures can be maintained more cost effectively and efficiently for the fly and larvae brood. Heat source - (item 2) Wiring of the fly box must be undertaken by a licenced electrician whom can “tag and test” the finished arrangement. I utilise two “Batten fittings” screwed to the upper inside rear wall of the plywood fly box. Both batten fittings contain light bulbs but 1 x 18 watt globe is sufficient to maintain temperatures for brood. Methodology Item Procedure and explanation 1 Bush fly larvae are raised in containers which are partly filled with fresh wheat bran moistened with full cream milk. Full cream long life milk may be used to moisten the bran or mix powdered milk, bran and water in appropriate quantities to rear bush fly larvae. The containers that I personally use are cut down 1 litre ice cream containers which fit comfortably thru the side entrance door of my plywood “fly box”. Five of these containers are utilised thus ensuring I obtain a container of fly larvae daily for feeding out. Surplus produced bush fly larvae may be fed to poultry or mature pheasants whom greedily consume them. Deep containers are more practical than shallow containers. Deep containers ensure the writhing contents of larvae do not spill within the fly box as they grow to maturity. It also ensures high moisture content is maintained within the rearing containers. Shallow containers with larger surface areas tend to dry out more quickly thus hindering development of the live larvae. 2 The small open top shallow sugar storage container is filled with sugar to nourish and sustain the adult flies. 3 Adult flies require a water drinking source which is comprised of a sponge rubber filled bottle filled with water. The sponge rubber prevents drowning of flies and allows wicking of water to the surface thus enabling the flies to obtain moisture without drowning. 4 On initial start-up, the starter kit brood is introduced into a (small container which accommodates the starter kit) to populate the “fly box”. The pupae hatch into adult flies within a couple of days. Generally a volume of 3 teaspoons of pupae or larvae is sufficient to initially populate the brood. The resultant hatch will produce sufficient flies to sustain ongoing egg laying. Two or three teaspoons of pupae or larvae are introduced from the raising containers into the “starter kit container” to replace the declining live fly numbers at fortnightly intervals. Use of fly spray. A word of warning related to use of fly sprays. Fly sprays are far more effective than many people realise. A short burst of fly spray within 5 of 6 metres of a fly box to kill a few escaped flies is guaranteed TO WIPE OUT your fly colony. If escape of half a dozen flies during servicing of your fly colony is an issue, it is recommended that the side entrance is fitted with an open ended panty hose leg sleeve which is used as an access sleeve through which all items are passed through the sleeve during servicing thus preventing escape of flies. Concerns may be held related to odour emitted from bush fly larvae production. Surprisingly the only odour produced is a weak ammonia odour emitted during the growth period of the larvae as the brood larvae consume the milk prior to its souring and spoilage. It is not recommended to feed larvae that have had contact with decaying flesh. |
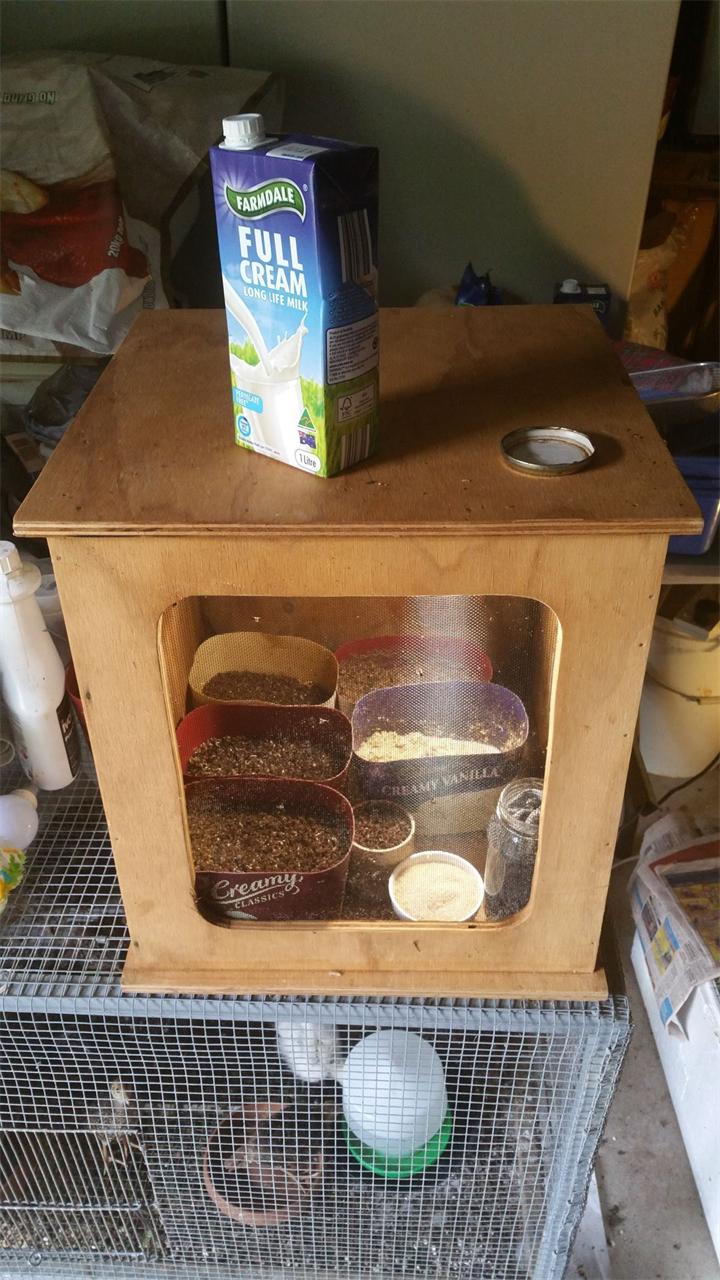
Photo shows Fly larvae breeding box and contents. Item 1 Five (5) x 1 litre larvae raising containers arranged from left front to rear in a clockwise direction containers day 5, day 4, day 3, day 2 & day 1 with white coloured contents. Item 2 One (1) small open top shallow sugar storage container (right foreground) Item 3 One (1) rubber sponge filled water container (far right foreground) Item 4 One (1) small container to accommodate starter kit. (located centre) Item 5 Five (5) larvae raising containers (10, 15 or 20 larvae raising containers for higher production) Text and photo by John Urane |